LibreChat Configuration
Now that we've got LibreChat up and running, let's dive into the configuration and setup of the chatbot. The LibreChat developers have built a robust platform that allows for a variety of customizations and integrations. In this guide, we will walk through the steps to configure LibreChat to suit your needs. I will focus primarily on enabling the OpenAI API integration and setting up authentication for the chatbot, but a future guide will delve into more advanced configurations and integrations.
Table of Contents
-
Clone the LibreChat Repository
-
LibreChat Configuration and Environment Files
Clone the LibreChat Repository
The first step in configuring LibreChat is to clone the project repository from GitHub. This will give you access to the source code and allow you to make any necessary changes to the configuration files. To clone the repository, follow these steps:
Steps to Clone the LibreChat Repository
-
SSH into your DigitalOcean Droplet using the following command:
ssh root@<your-droplet-ip> -
Ensure you are using non-root user:
su - <yourusername> -
If you are in the root directory, navigate to the home directory:
cd ~ -
Run the following command to clone the LibreChat repository:
sudo git clone https://github.com/danny-avila/LibreChat.git -
Navigate to the LibreChat directory:
cd LibreChat
LibreChat Configuration and Environment Files
The LibreChat project uses environment files to store configuration settings and sensitive information. A sample file is included that we can alter to suit our needs. In this section, we will walk through the process of creating the necessary environment files and configuring LibreChat to use the OpenAI API.
Steps to Configure LibreChat YAML File
-
From inside the LibreChat directory, run the following to open the file in the nano text editor:
nano librechat.yaml -
The LibreChat developers have included a sample configuration file that we can use as a template. Copy the following to the
librechat.yamlfile:# For more information, see the Configuration Guide:
# https://docs.librechat.ai/install/configuration/custom_config.html
# Configuration version (required)
version: 1.0.5
# This setting caches the config file for faster loading across app lifecycle
cache: true -
Exit the Nano editor using
Ctrl + Xand save the changes by typingYand pressingEnter.
Steps to Configure the Environment File (.env)
The developers have provided us with a sample .env file that is pre-loaded with a lot of possible settings. Our configuration will consist of uncommenting a number of lines here and adding in a few values.
-
From inside the LibreChat directory, run the following to copy the sample
.envfile to a new file that will be used for our production environment:sudo cp .env.example .env -
We need to generate some keys for our authentication and encryption. The developers of LibreChat have provided a Replit that will generate these keys for us. You can access the Replit here.
-
Click to Fork the file which will convert the replit to your own version with varialbes that will generate unique keys for you. Click the green
Runbutton. You'll see a number of keys generated in the console:CREDS_IV- This is the initialization vector for the encryptionCREDS_KEY- This is the key for the encryptionJWT_SECRET- This is the secret for the JSON Web TokenJWT_REFRESH_SECRET- This is the secret for the refresh token

-
With these keys generated, we can now add them to the
.envfile. Open the file in the Nano text editor:nano .envwarningMake sure you use
sudoto open the file in the Nano editor. Failure to do so will result in the file opening in read-only mode and you won't be able to save your changes.Feel free to browse this file. It's pretty extensive and has a lot of options. We'll be focusing on a few of these.
-
Search for the line with
CREDS_IV. This Key and the CREDS_KEY are around 150 lines down in thePluginssection of the file. Uncomment this line if it's not already uncommented or replace existing value and paste in the value generated from the Replit. -
Copy and paste the
CREDS_KEYvalue from the Replit into the.envfile as well. This is the encryption key and is right above theCREDS_IVvalue in the file -
Do the same for the
JWT_SECRETandJWT_REFRESH_SECRETvalues. These are located in theRegistration and Loginsection of the file.
Registration Options - Closed or Open Registration?
LibreChat ships with a robust authentication / login method where registrations can be turned off or on. Option one below, "Disabled", will walk through the steps to ensure no outside registrations to your app can occur. This method is good for when you have a set list of users that are pre-approved to use the chatbot all of whom are using a single API key.
The following steps will require that you have an OpenAI API key. If you don't have one, you can sign up for a free account on the OpenAI website.
Select the Method that Suits Your Needs in the Tabs Below
- Enabled Sign-ups default
- Disabled Sign-ups
Registration Enabled
The cleverness of the LibreChat devs have provided that you needn't run the app in a closed environment. They've baked in a "BYOK" (Bring your own Keys) method that allows anyone to acces your app and create an account. This is the default setting for the app.
Once logged in they can take their own API keys for whichever services you've enabled on your LibreChat app and set them up in their own account. No need to worry about sharing your keys with others and crying over your credit card bill when you've had 4000 people sign up and run up a bill on your account.
You can set usage limits with OpenAI - probably with most other services as well. This will help you keep your costs down and your app secure.
Steps to Enable Registrations
-
Open the
.envfile in the Nano text editor:nano .env -
Search for the line with
ALLOW_REGISTRATION=falseand change it totrue. This will enable the registration option for the chatbot. Unless you've previously changed this setting, it should be set totrueby default. -
No need to set your keys here. If you scroll to the OpenAI section, you'll see a line that says
OPENAI_API_KEY=user_provided.
There is actually not much to do out of the box for this method. You can simply deploy the app and let users sign up and use their own API keys.
Starting LibreChat
-
First let's make sure our Docker engine is up and running. Run the following command to check the status of the container:
sudo docker ps -
Run this to ensure it's running:
sudo systemctl start docker -
Start the app container:
sudo docker-compose -f ./deploy-compose.yml up -d -
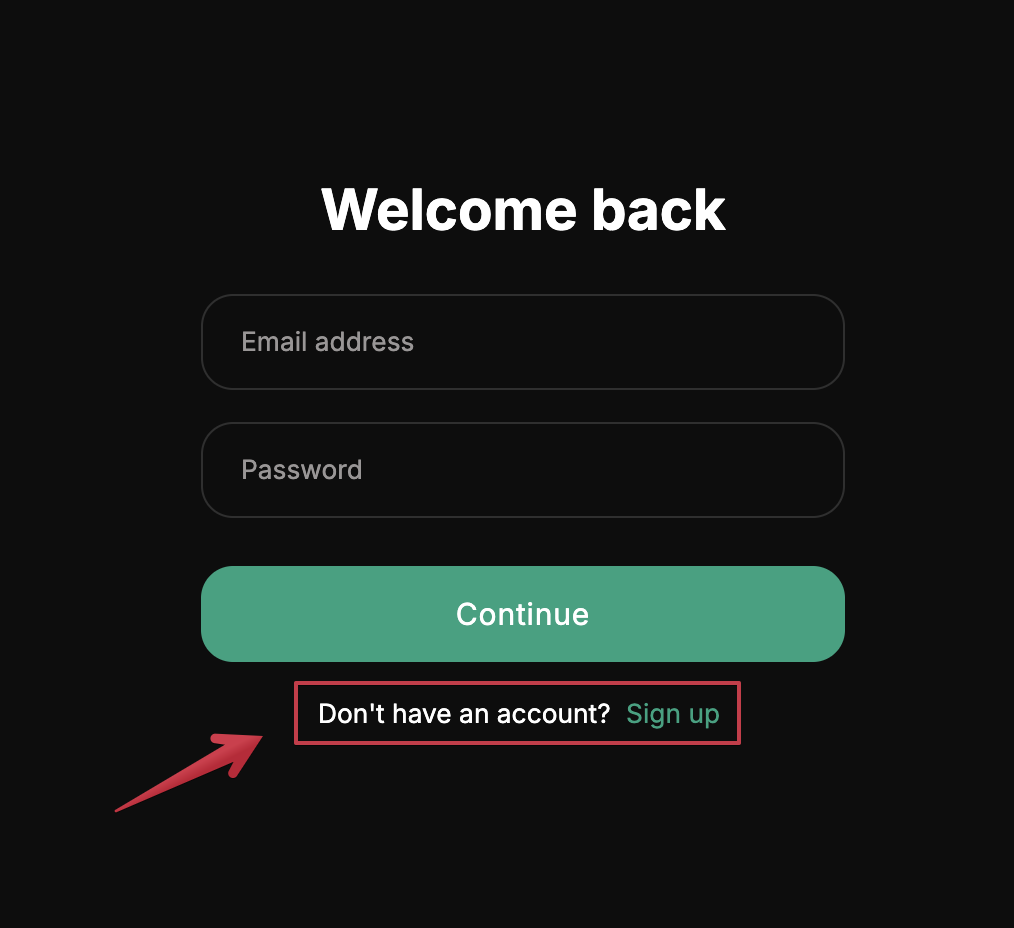
Navigate to your app -- in your browser enter the DigitalOcean Droplet IP address and you'll see the login screen. You'll see an option to create a new account.
-
Log in with your email and password and you'll be taken to the chatbot. Click the
OpenAIbutton at the top which drops down the list of services you can use. Click on the OpenAI service and and then click the gear icon for settings and you'll see a prompt to enter your API key.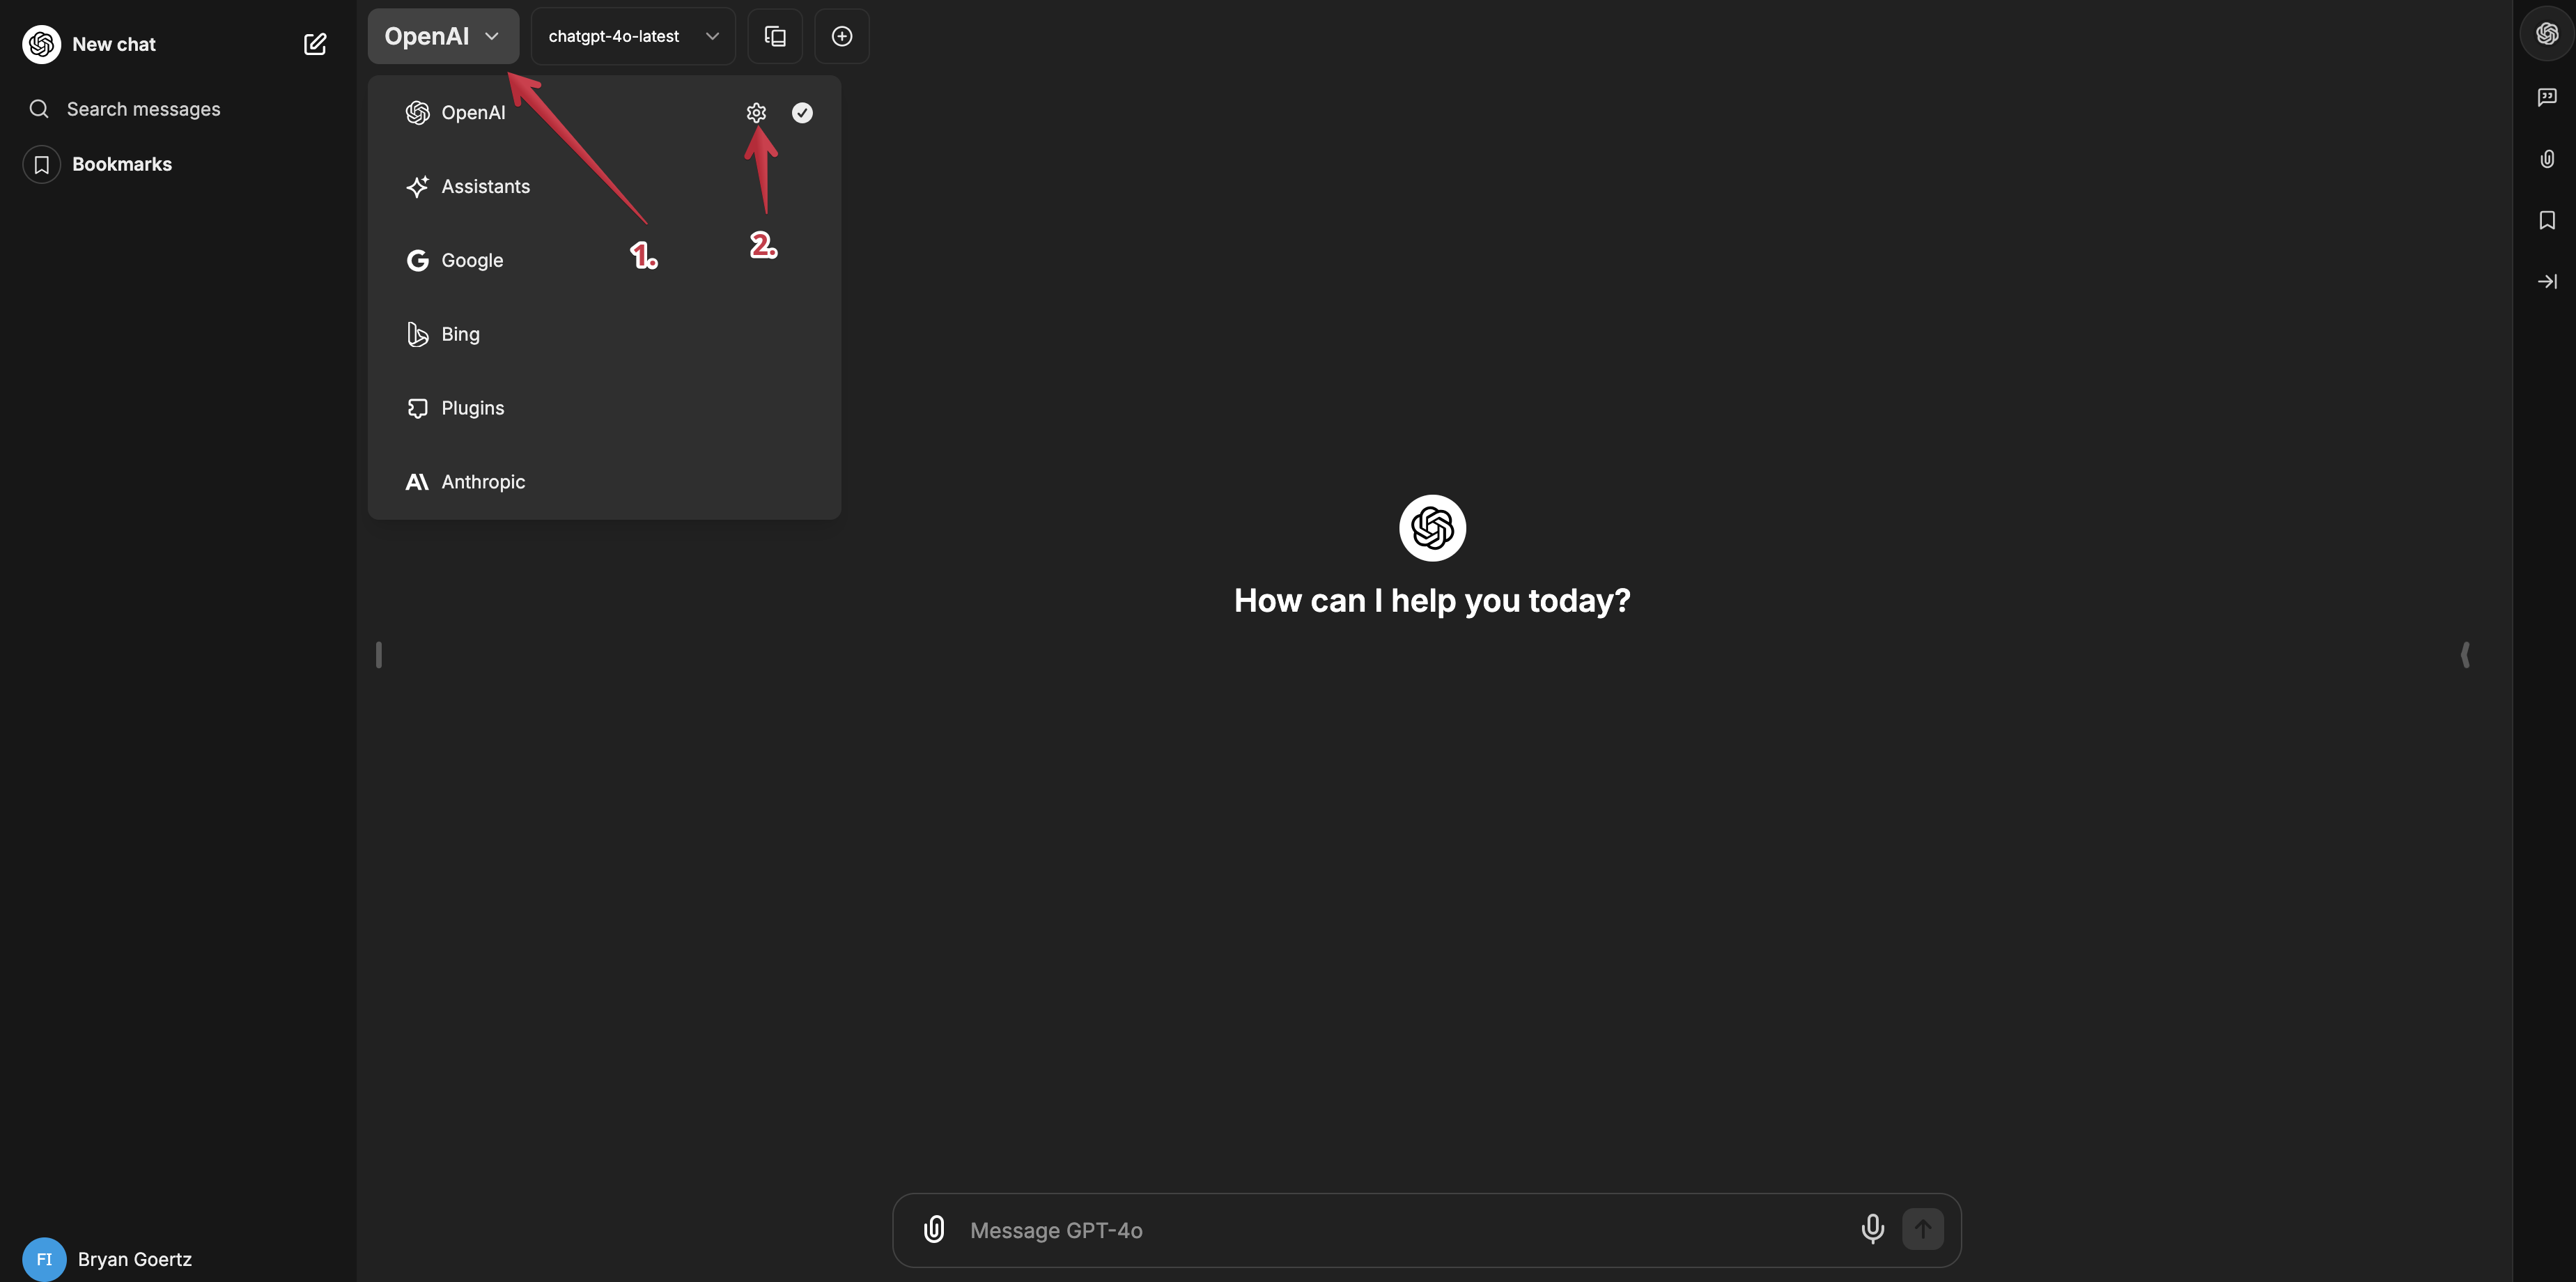
-
Enter your API key and select if and when you'd like it to expire and click
Save. You're now set up to use the OpenAI service with your chatbot.
The following steps will disable sign-ups for your chatbot. If you've opted to pre-populate the API key in the .env file, this is the option you'll want to choose.
Steps to Disable Registrations
-
Open the
.envfile in the Nano text editor:nano .env -
Search for the line with
ALLOW_REGISTRATION=trueand change it tofalse. This will disable the registration option for the chatbot. -
Search for the dedicated OpenAI section of the file. You'll see a line that says
OPENAI_API_KEY=user_provided. This is the default setting.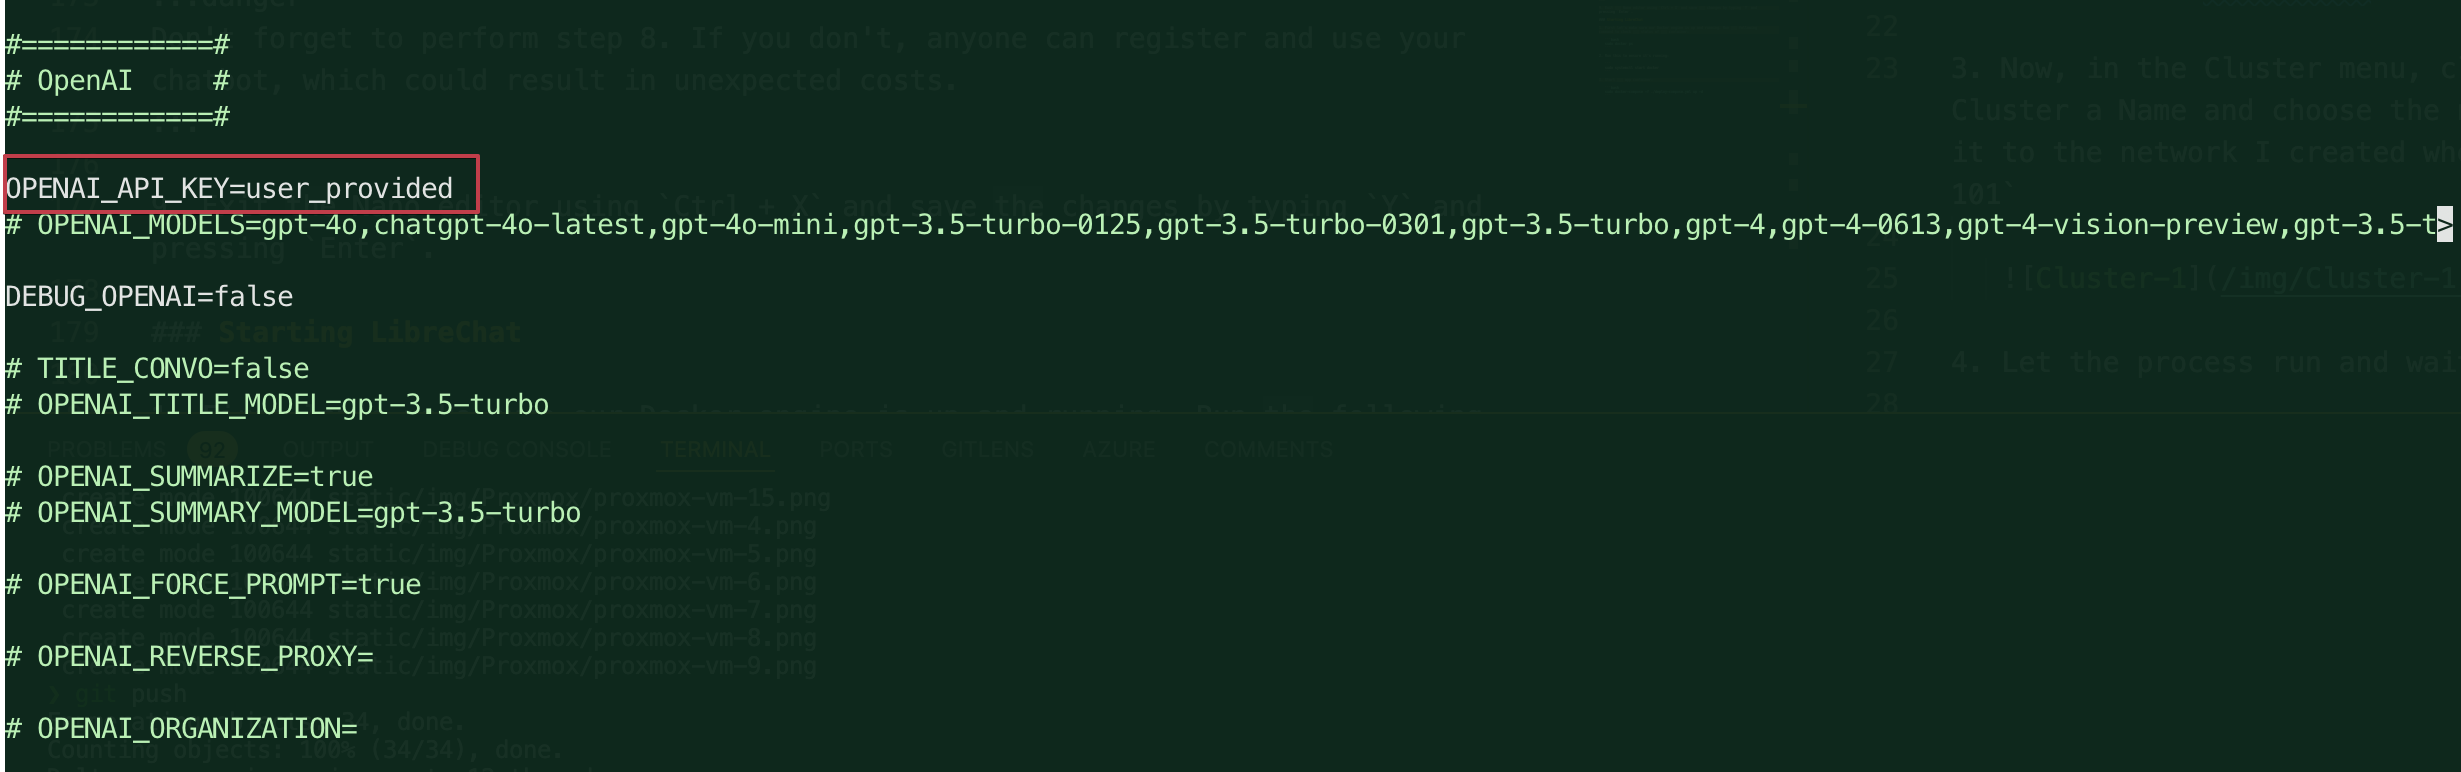
You can change the value from
user_providedto the API key you generated from the OpenAI platform, or comment out the line and paste your API key directly into the file. like this:
Replace the
<your key here>with your actual API key.dangerIf you deploy the chatbot with the API key in the
.envfile, you'll want to ensure that the registration option is disabled. If you don't, anyone can register and use your chatbot, which could result in unexpected costs.Make sure you set
ALLOW_REGISTRATION=falseto prevent unauthorized access to your chatbot and potentially running up a large bill.
With these in place, when you login to the chatbot you'll see the login screen, but no option to register.
Starting LibreChat
-
First let's make sure our Docker engine is up and running. Run the following command to check the status of the container:
sudo docker ps -
Run this to ensure it's running:
sudo systemctl start docker -
Start the app container:
sudo docker-compose -f ./deploy-compose.yml up -d
Scripts for Adding and Removing Users
So, how do you add and remove users? LibreChat have built a few handy scripts for that available here. I'll reproduce them here for ease of use:
-
Adding a user - for the defualt docker-compose.yml file
docker-compose exec api npm run create-user -
Script for the deploy-compose.yml file (which we are using)
docker exec -it LibreChat-API /bin/sh -c "cd .. && npm run create-user" -
Script for local development
npm run create-user
Run the deploy-compose.yml script to test it out.
-
Run the script:
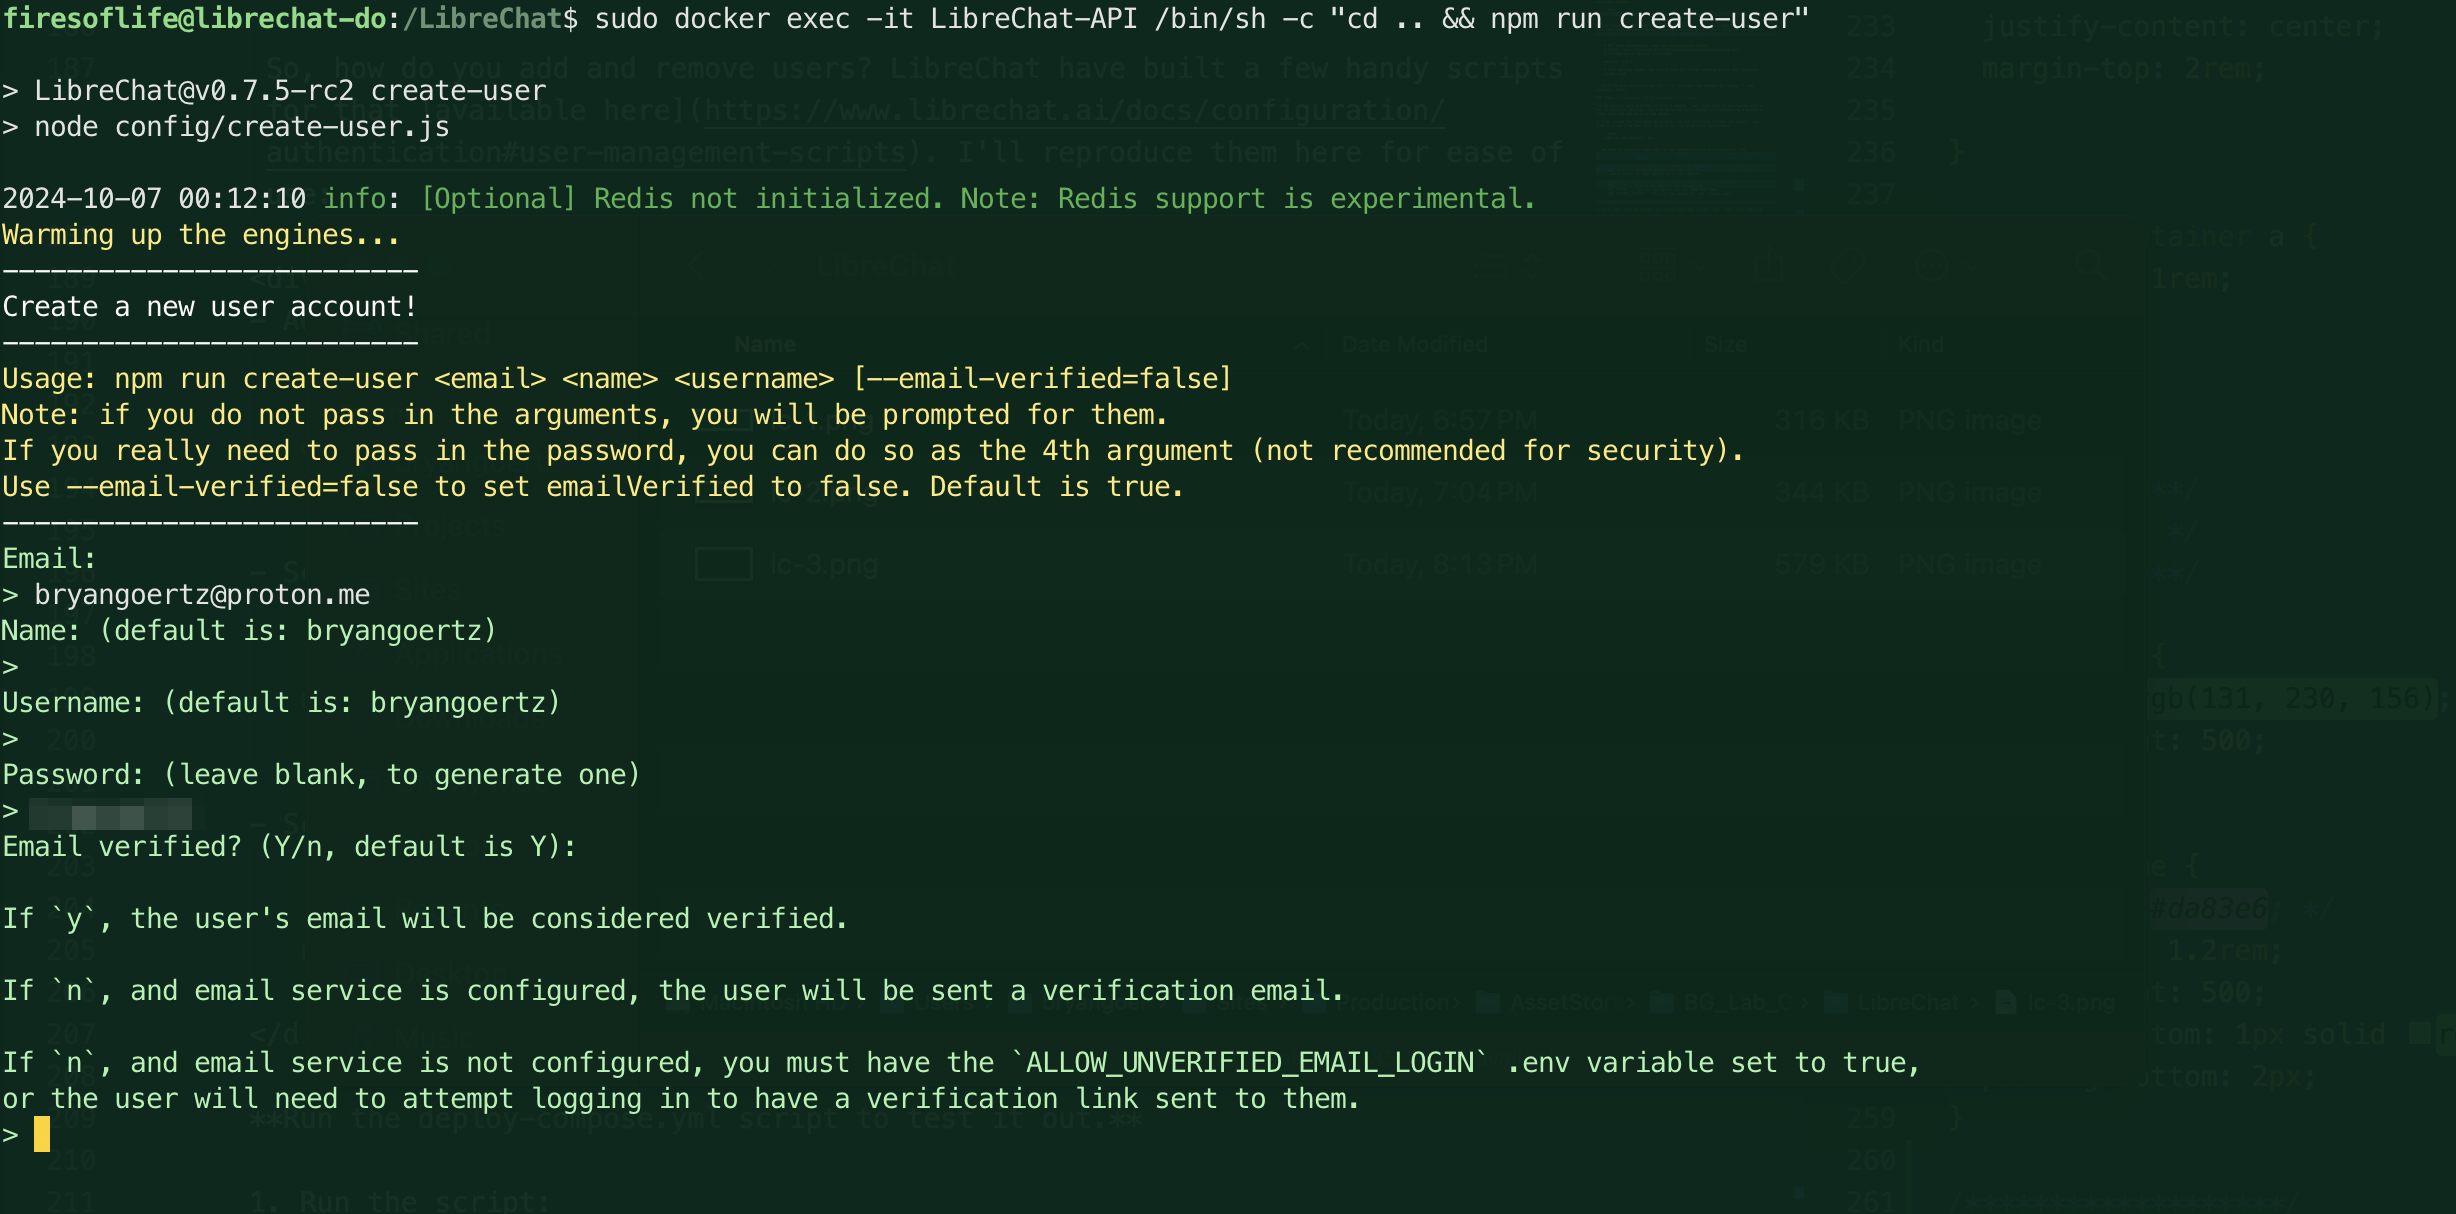
docker exec -it LibreChat-API /bin/sh -c "cd .. && npm run create-user" -
You'll be prompted to enter an email address, confirm a name and username (both of which can be changed from the default), and then set a password. Once you've done this, you'll see a message that the user has been created.
 note
noteNote the output here indicates possibilities for handling user permission and notification with a mailer service set up. These settings can be configured in the
.envfile.We are quite done yet! Notice that we haven't yet created the user since the prompts allow for emailed verification. We are also given an option to simply force verification for the user we just created. This is a good option if you're setting up a user for yourself and don't want to wait for the email or haven't set up a mailer service.
-
Type
yto verify the user and you'll see a message that the user has been verified.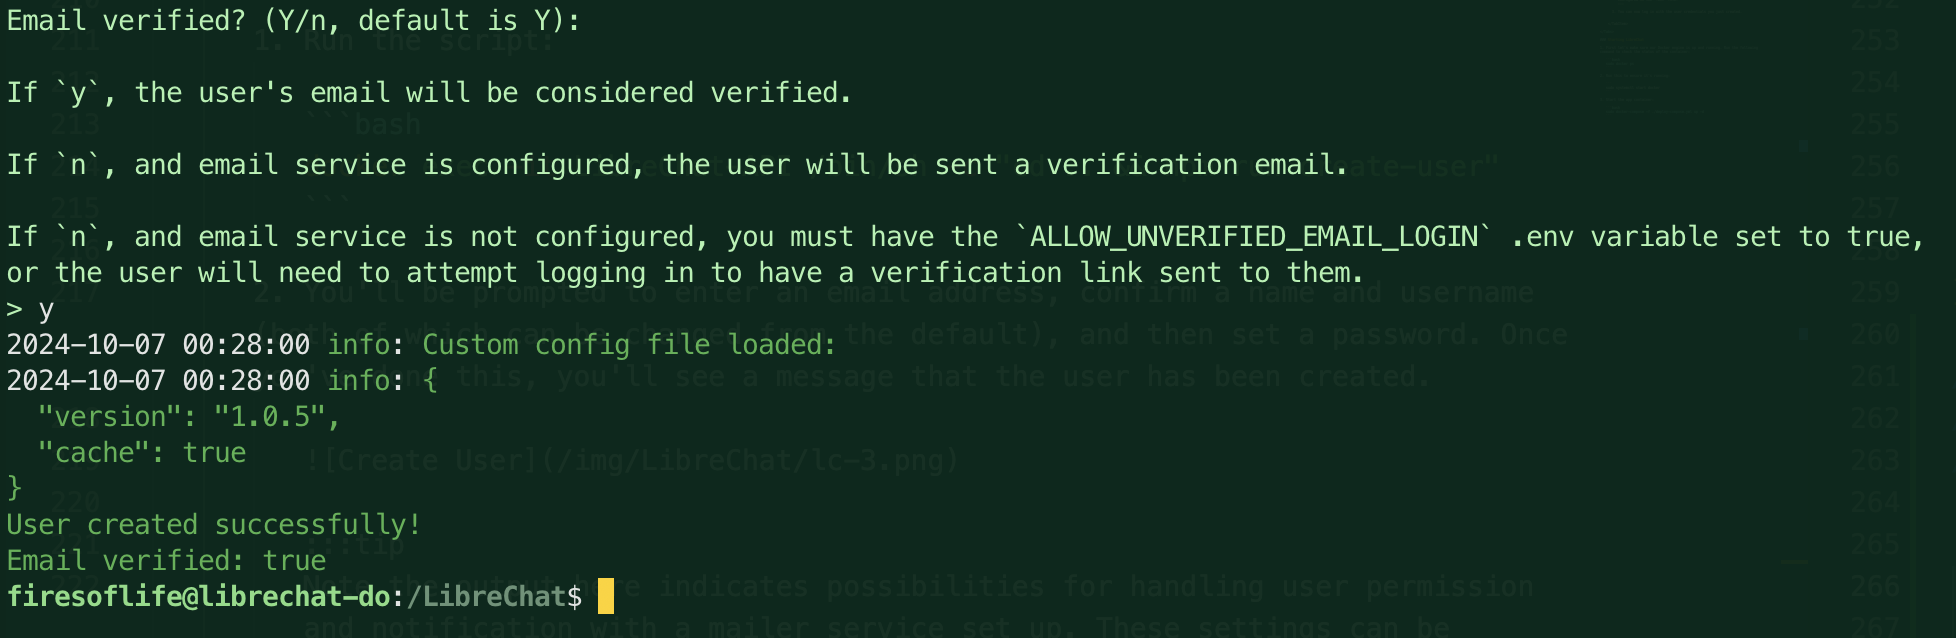
-
Now navigate to the chatbot and login with the credentials you just created. You'll be able to access the chatbot and use it as you see fit.
tipIf you've forgotten how to access your LibreChat app, simply log in to your DigitalOcean Droplet and note the IP address of your server. Pop this into your browser and you'll see your login screen. Example:
http://113.12.343.123
That's it! You can now manage users and access your chatbot without the need for registration. Here's a quick recap of the steps we took:
- Disabled the registration option in the
.envfile withALLOW_REGISTRATION=false - Added the OpenAI API key to the
.envfile to enable the chatbot to interact with the OpenAI API - Used the provided scripts to create a user and verify them for access to the chatbot
If you'd prefer a BYOK (Bring your own Keys) method that allows anyone to acces your app and create an account then check out the other tab above for enabling sign-ups and how to manage users in that scenario.
Congratulations! You've now configured LibreChat to suit your needs. You can now use the chatbot with the OpenAI API integration and have set up authentication for the chatbot.
Note that depending on which method you chose, you may need to manage users differently. If you opted for the closed registration method, you'll need to use the provided scripts to add and verify users. If you chose the open registration method, users can create their own accounts and manage their API keys.
If you choose to change this in the future, don't forget that you'll need to redeploy the docker container to apply the changes.
You may have noticed that the app is accessed over HTTP. This poses a few porblems. First, it's not secure. Second, it is the source of an issue that causes our session to expire every 15 minutes or on refresh.
Up next: Get a custom domain, make is secure and fix the session issue.