Securing a Domain for LibreChat with Nginx
If you've spent some time with the LibreChat app, you may have noticed a few things that are ... well, not quite ... great. This is not because the devs haven't provided the right tools -- you'll see they certainly have -- but rather, the problem is our very basic
Improvements to the Security and Accessibility of our App
HTTPS instead of HTTP - If you've studied anything about cybersecurity, you'll have noticed and possible asked "wait, why are we using HTTP and not HTTPS?" This is a great question and one that we will be addressing in this guide.
Custom Domain - IP addresses are fun and remind us of how complex routing and networking can be, but you and I know, accessing a site via and IP address might be cool for a hot second, but ... it is only cool for a hot second. I'll be walking through setting up a custom domain -- actually, I'll be using a subdomain -- for our LibreChat app.
Nginx - Nginx is a powerful web server that can be used to serve static content, reverse proxy, and more. In this guide, we will be using Nginx to secure our LibreChat app with HTTPS and to serve our app on a custom domain.
Performing some of these above steps will also work to resolve the annoying quirck where the app session is lost when the app is refreshed or you're logged out very frequently. This is because the app is being served over HTTP and not HTTPS and the JWT token is configured to work best when served over HTTPS.
LibreChat have a blog with details on this here. The blog discusses the issue in teh context of a development environment, but the same principles apply to a production environment and will be resolved with our Nginx setup.
Without further ado, let's get started.
Prerequisites & Assumptions
You must have:
- Completed everything we've covered in the previous guides or have a similar setup:
- Digital Ocean Droplet running Ubuntu 22.04 with Docker installed and LibreChat deployed
- A domain name (I'll be using a subdomain for this guide) that I have registered with Hostinger. That's my referral link. Help me buy more coffee, please.
Domain and Proxy Options
The Official LibreChat Documentation provides guides using a few different options for securing your domain. The list is not exahaustive, of course, but there are excellent guides for the following:
- Nginx
- Cloudflare
- Ngrok
- Traefik
In this guide, we will be using Nginx to secure our LibreChat app with HTTPS and to serve it on a custom domain.
Domain Setup
To get started, make sure you have all the necessary things in place that are listed in the Prerequisites list above: your DigitalOcean Droplet running Ubuntu 22.04, Docker installed, LibreChat deployed, and a domain name. You'll also need to have terminal access to your Droplet either through SSH or the DigitalOcean console.
Oh, and if you haven't installed Node.js and NPM on your Droplet. If you haven't, you can pop back to the Dockerized Setup of LibreChat Guide - Step 5 to get that done.
Step 1: Point your Domain to your Droplet
Right off the hop, we are going to be getting our hands dirty with DNS settings and working with our domain. I wasn't kidding about those prerequisites!
As previously mentioned, I have my root domain registered and hosted with Hostinger and can add subdomains through their interface. I've created a subdomain called chat that I will be using for this guide. For this guide, I will be showing images from the Hostinger interface, but the process should be similar for other domain registrars.
-
Log in to your domain registrar and navigate to the DNS settings for your domain. You should see a list of records that look something like this:

When I created my subdomain, an
A recordandAAAA recordwere automatically created for me. The address on creation is pointing to Hostinger's servers. I will need to update these records to point to my DigitalOcean Droplet. -
If you have an
A recordin your DNS settings, you can simply edit it rather than creating one anew. Navigate to your Droplet and copy your IP address. This is the address you've been using to access your app instance so far. Change the current A record to point to this IP address.noteMake sure you are editing the subdomain a record if using a subdomain or the root (sometimes showsing an @ in the name field) record if using a root domain. Your domain may have other a records for different services, so be sure to edit the correct one.
-
Since we aren't using IPv6, I will be deleting the
AAAA recordthat was created for me. Though you'll notice that your droplet can have IPv6 enabled, and your domains DNS settings may have populated anAAAA recordfor you. If you're not using IPv6, you can delete this record. -
Open a terminal and ping your new domain to ensure it is pointing to your Droplet. You should see the IP address of your Droplet in the response.
ping chat.yourdomain.comIf you see the IP address of your Droplet in the response, you're good to go. If not, double-check your DNS settings and make sure you've updated the correct records.
You should also be able to access your app using your new domain in a web browser. If you can't, you may need to wait a bit for the DNS changes to propagate. So far, my domain is pointed in to my app, but still not using HTTPS.

Secure your Domain with SSL/TLS from Let's Encrypt
Now that we have our domain pointing to our Droplet, we can move on to securing it with SSL/TLS from Let's Encrypt. Let's Encrypt is a free, automated, and open Certificate Authority that provides free SSL/TLS certificates for your domain.
We'll need to install Certbot, a tool that will help us obtain and install the SSL/TLS certificate from Let's Encrypt.
Step 1: Install Certbot
My Droplet is running Ubuntu so I'll be following the instructions for installing Certbot on Ubuntu. The LibreChat documentation provides instructions for CentOS as well and I'm sure you can find instructions for other distributions on the world wide web.
-
SSH into your Droplet as root
-
Switch to the non-root user you created when you set up your Droplet
su - <yourusername> -
Update the package list and install Certbot
sudo apt update -
Run the following command to install Certbot
sudo apt-get install certbot python3-certbot-nginxtipDepending on where your installed your Librechat app, when switching to your non-root user, you may need to navigate to the directory where your app is installed. For example, if you installed your app before created a non-root user it may be in the root directory, you can navigate to the app directory with the following command:
cd ../..
Step 2: Obtain the SSL/TLS Certificate
Now that we have Certbot installed, we can use it to obtain the SSL/TLS certificate from Let's Encrypt.
-
Run the following command to obtain the certificate
sudo certbot --nginxYou'll be prompted to enter your email address and agree to the terms of service with the following message:

-
Enter your email address and agree to the terms of service by typing
yand pressingEnter
-
You'll then be asked if they can spam you ... I mean, if you'd like to receive emails from the Electronic Frontier Foundation. You can choose
yornand pressEnter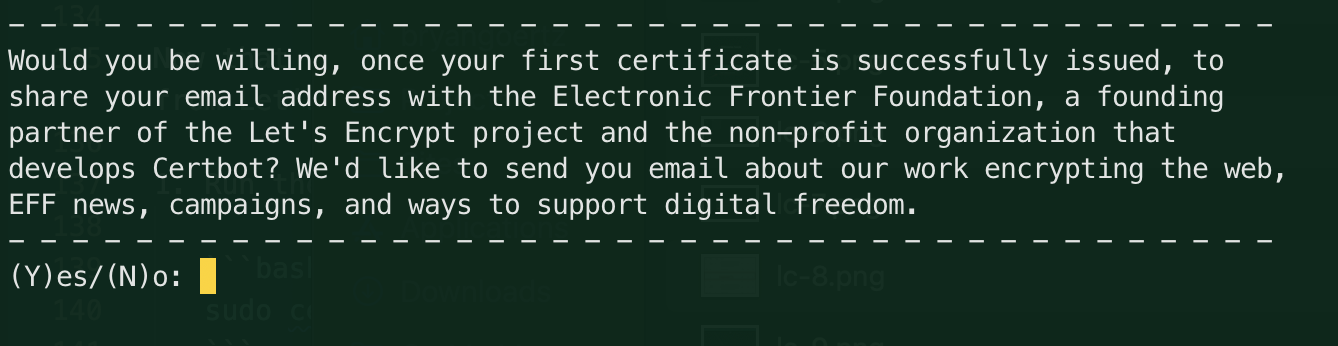
-
Next you'll need to enter the domain(s) you'd like to secure. You can enter multiple domains separated by a comma. For this guide, I'll be securing my subdomain
chat, so I'll enterchat.bryangoertz.comand pressEnter: tip
tipMy first attempt at requesting a certificate failed with an error suggesting that port 80 was in use by another process. There is probably a more graceful way to resolve this, but since I'm the only one using my Droplet, I simply used
docker compose downand then rebooted my Droplet. After rebooting, I ran thesudo certbot --nginxcommand again and it worked without issue. -
Certbot will then obtain the certificate and configure Nginx to use it. You should see a message indicating that the certificate was successfully obtained and installed:
 note
noteIt's a good idea to jot down the path to your certificate and key files as we will be adding them to our Nginx configuration in the next step.
Nginx Reverse Proxy Configuration
We are almost there! We have our domain pointing to our Droplet and we have secured it with SSL/TLS from Let's Encrypt. The last step is to configure Nginx to serve our LibreChat app on our custom domain. If you try to access your app now, you'll likely see the default Nginx page or a 404 error. We need to configure Nginx to serve our app instead.
The LibreChat docs provide two options for configuring Nginx. One is for a host-based deployment (if you are not using Docker) and the other is for a Docker-based deployment. Since we are using Docker, we will be following the Docker-based deployment instructions.
The Docker-based deployment uses deploy-compose.yml file to define the services and networks for the app. We will be using this file to configure Nginx to serve our app on our custom domain.
Step 1: Add Domain & Path to the client/nginx.conf File
-
SSH into your Droplet as root
-
switch to the non-root user you created when you set up your Droplet
su - <yourusername> -
Navigate to the directory where your app is installed.
-
Open the
client/nginx.conffile in a text editornano client/nginx.conf
A few edits will need to be made to the nginx.conf file. We will take this step by step.
client/nginx.conf
-
In the file there are useful Header style comments that will help orient you. The first section is the section labled
Non-SSLwith comment hashes spanning the width of the file. Our first edit will be below this section. -
Modify the
server_nameline by adding your domain in place of 'localhost'.# server_name chat.yourdomain.com; -
The file comments indicate that if we are using SSL, we should comment out any lines in the
Non-SSLsection and uncomment the lines in theSSLsection. We will be doing this next. We've already commented out theserver_nameline in theNon-SSLsection. There are a few others without comments. Let's hit 'em with a#as well.#client_max_body_size 25M;
#location /api/ {
# proxy_pass http://api:3080$request_uri;
#}
#location / {
# proxy_pass http://api:3080/;
#}Here is a what the
Non-SSLsection should look like after the edits: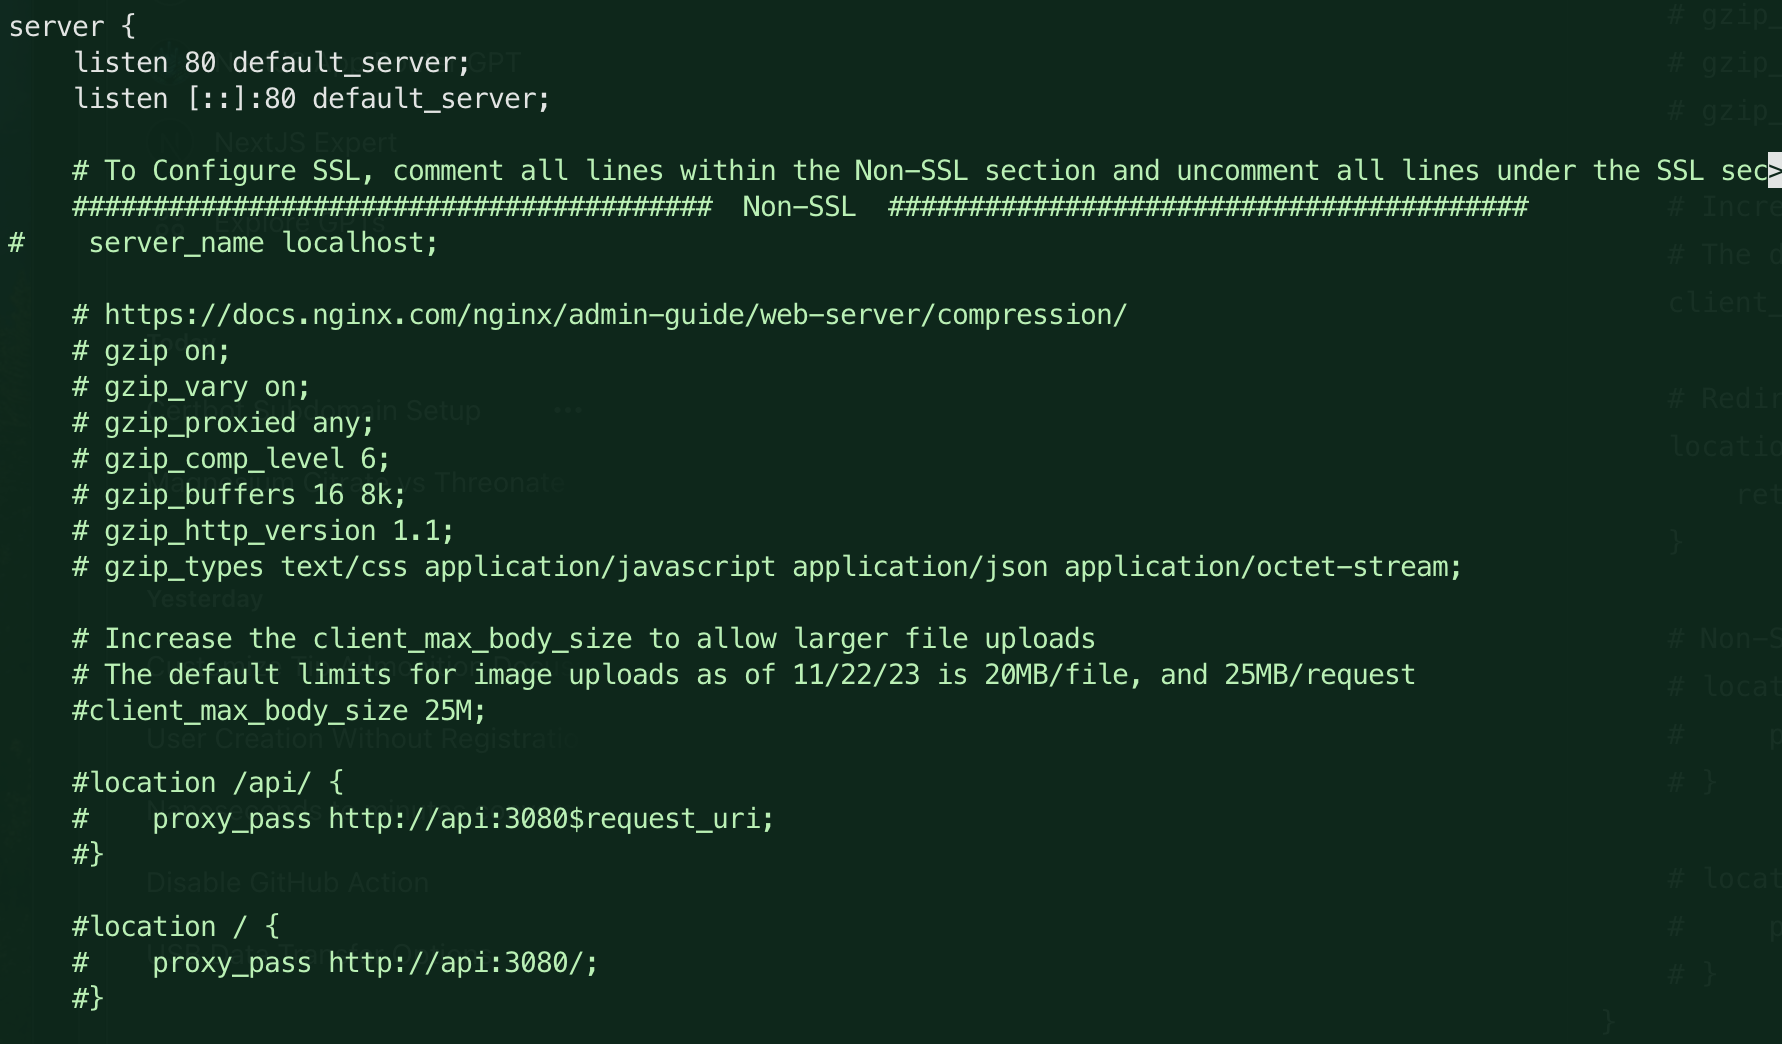
-
Next, we will uncomment some of the lines in the
SSLsection and replace some others. This will allow Nginx to serve the app on our custom domain.Under the
SSLsection, there are a few remnants of code that finish off the server block started in theNon-SSLsection. We will need these as they tell Nginx that we are creating a redirect from HTTP to HTTPS. Right beneath theNon-SSLsection, you'll see the following which you should uncomment:######################################## SSL ########################################
# Redirect all http traffic to https
location / {
return 301 https://$host$request_uri;
}
}Replace
chat.yourdomain.comwith your custom domain. -
We will skip over the gzip (compression) options and move the block of SSL lines.
Remove these lines from the
SSLsection:#ssl_certificate /etc/nginx/ssl/nginx.crt;
#ssl_certificate_key /etc/nginx/ssl/nginx.key;
#ssl_session_timeout 1d;
#ssl_session_cache shared:MozSSL:10m; # about 40000 sessions
#ssl_session_tickets off;Replace them with the paths to your certification that you should have jotted down from the Certbot output:
 ssl_certificate /etc/letsencrypt/live/chat.yourdomain.com/fullchain.pem;
 ssl_certificate_key /etc/letsencrypt/live/chat.yourdomain.com/privkey.pem;
 ssl_dhparam /etc/letsencrypt/ssl-dhparams.pem;
Replace
chat.yourdomain.comwith your custom domain. -
Look further down about 15 lines or so and you'll see another line that needs to be updated. This line is the
server_nameline. Uncomment it and replacelocalhostwith your custom domain.server_name chat.yourdomain.com;Replace
chat.yourdomain.comwith your custom domain. -
Finally we will uncomment the location /api and location / blocks. These are the lines that tell Nginx to proxy requests to the API and client services. Uncomment them by removing the
#at the beginning of each line.location /api/ {
proxy_pass http://api:3080$request_uri;
}
location / {
proxy_pass http://api:3080/;
}Here is what the
SSLsection should look like after the edits. I've removed the lines in the SSL section that would otherwise be commented out. You can remove them if you like, or simply comment them out if you think you'll want to use them later: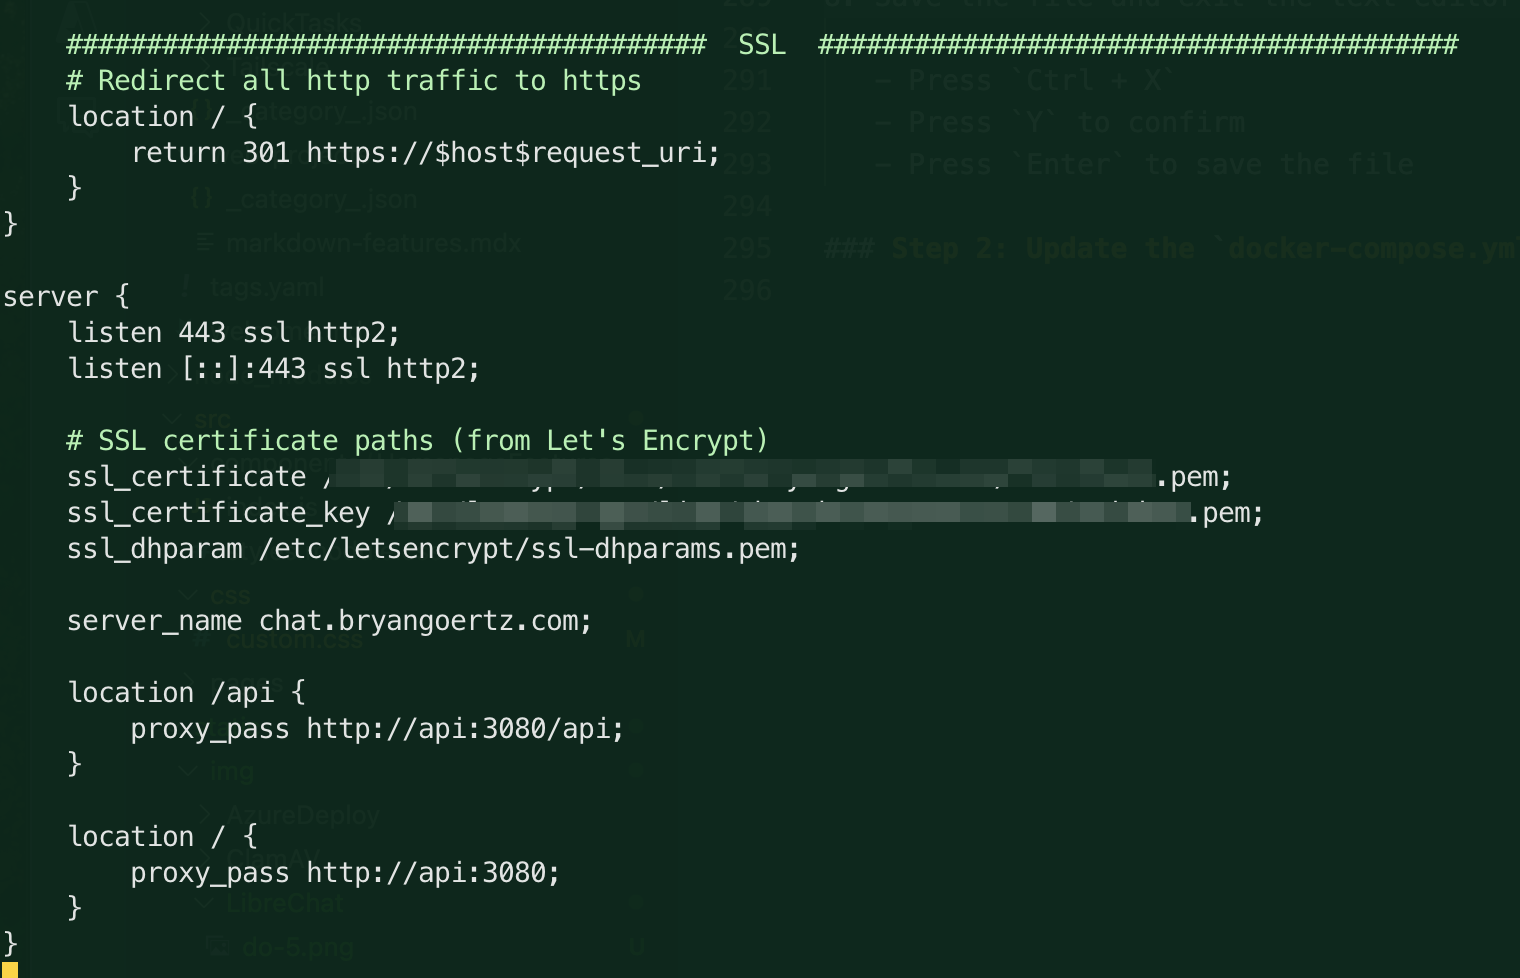
-
Save the file and exit the text editor
- Press
Ctrl + X - Press
Yto confirm - Press
Enterto save the file
- Press
Step 2: Update the docker-compose.yml File
We need to tell to load the certificate files from the host.
-
Open the
docker-compose.ymlfile in a text editornano docker-compose.yml -
Currently, there is only the default entry under client > volumes.
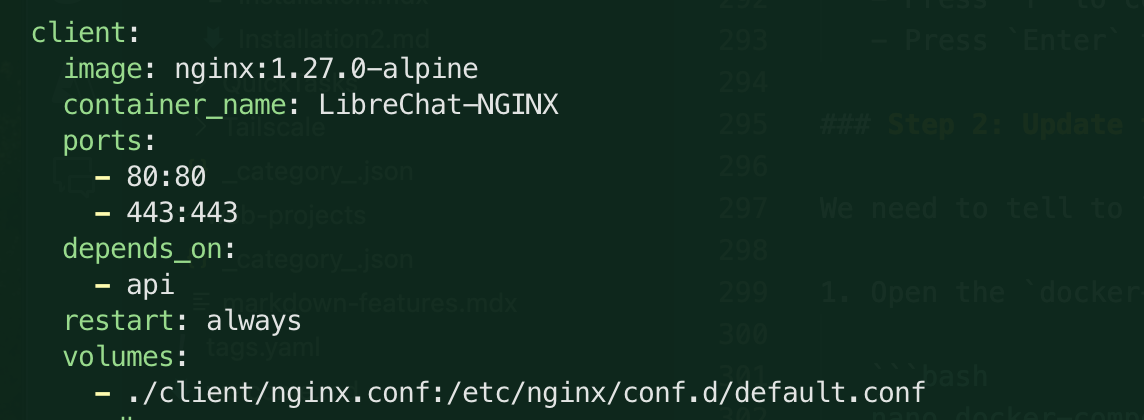
Let's add in the following lines to the client > volumes section:
client:
  # ...
  volumes:
    - ./client/nginx.conf:/etc/nginx/conf.d/default.conf
    - /etc/letsencrypt/live/<your-domain>:/etc/letsencrypt/live/<your-domain>
    - /etc/letsencrypt/archive/<your-domain>:/etc/letsencrypt/archive/<your-domain>
    - /etc/letsencrypt/options-ssl-nginx.conf:/etc/letsencrypt/options-ssl-nginx.conf
- /etc/letsencrypt/ssl-dhparams.pem:/etc/letsencrypt/ssl-dhparams.pemtipAs per usual, replace
<your-domain>with your custom domain.
Step 3: Version Control and Rebuild the Docker Containers
Now we will make use of our git skills and commit the changes we've made to the nginx.conf and docker-compose.yml files. I'm not entirely sure what the purpose of making a commit to a new branch is here, but it certainly is following best practices. I surmise that we may be doing so to ensure our configuration persists across updates to the app.
-
Stop your Docker containers
sudo npm run stop:deployed -
Run the following commands to commit the changes:
git add .
git commit -m "Add Nginx configuration for custom domain"
git checkout -b productionnoteYou may need to add
sudoto the beginning of the commands if you are not running as the root user. -
I haven't pushed to a remote repository yet. I'll do that a bit later. For now, I'll restart the Docker containers to apply the changes:
sudo npm rebase:deployed
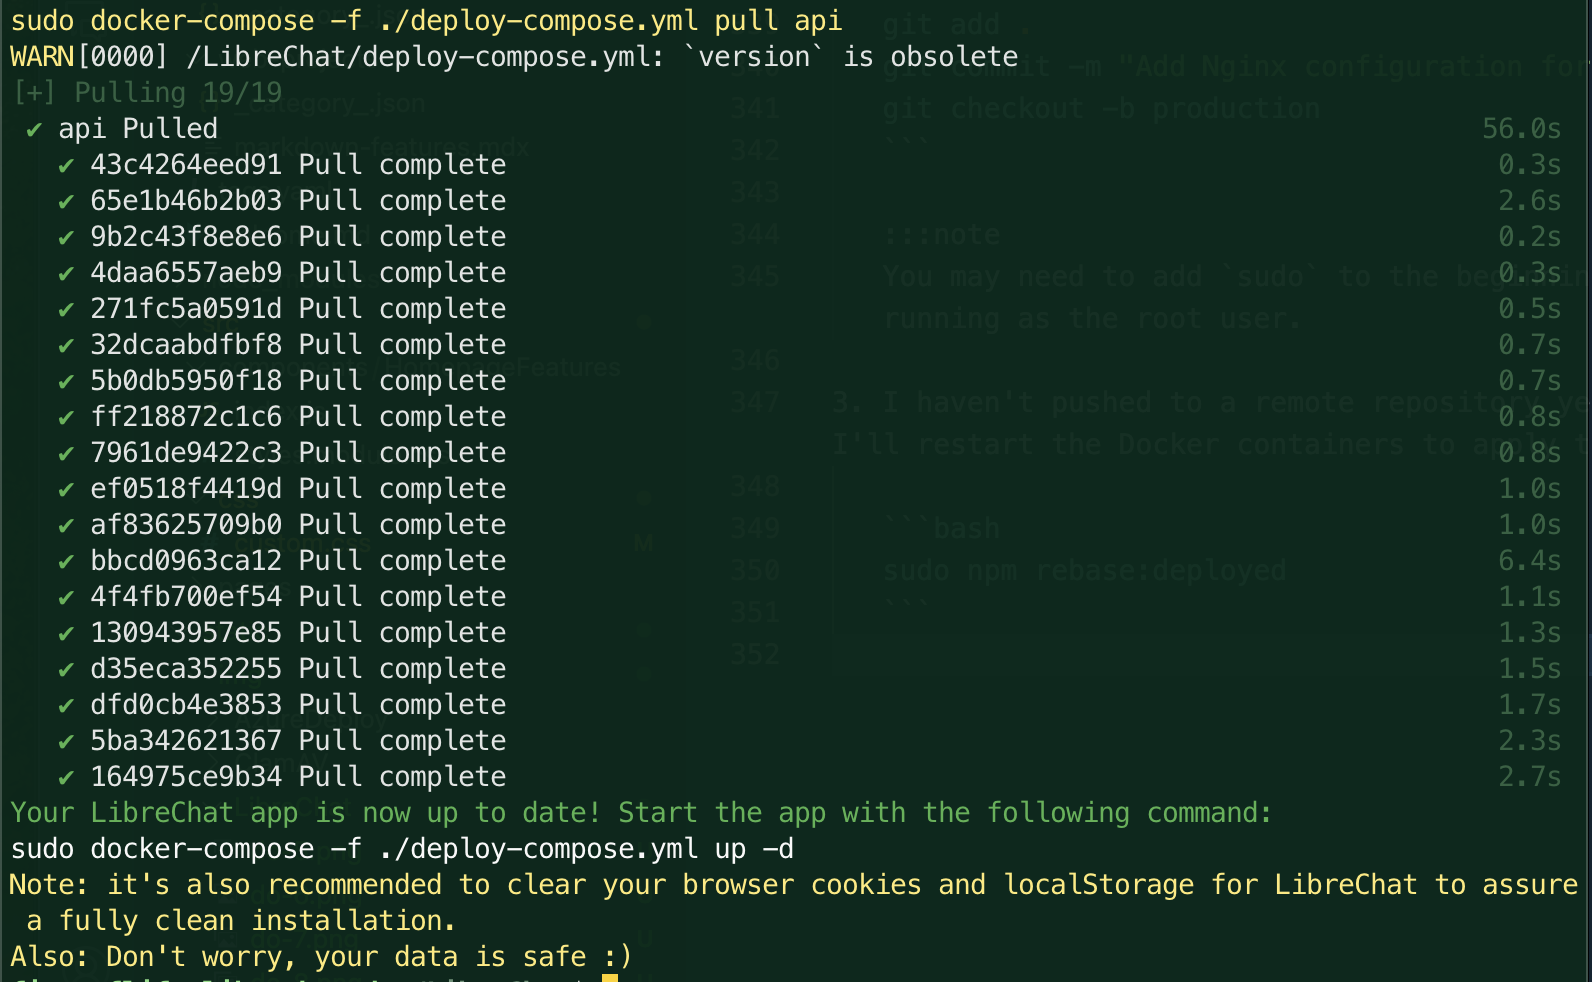
With that we get a waterfall of matrixy fun with a nice little message at the end assuring us that this action was non-destructive and the prompt to restart the containers.
Step 4: Start the App
-
Ensure you are in the correct directory and logged in as the non-root user
-
Start the app:
sudo docker-compose -f ./deploy-compose.yml up -d
You may get an error saying that port 80 is already in use. This is likely because Nginx is already running on port 80. You can stop Nginx with the following command:
sudo service nginx stop
Then try starting the app again.
sudo docker-compose -f ./deploy-compose.yml up -d
Confirmations
-
Open a web browser and navigate to your custom domain. You should see the LibreChat app served over HTTPS on your custom domain. Sweet!
-
Check the SSL certificate by clicking on the padlock icon in the address bar. You should see that the certificate is valid and issued by Let's Encrypt. Double sweet!
-
Hit that refresh button after you've logged in and created a chat session. You should see that your session persists. No more being logged out every time you refresh the page. Triple sweet!
That's it for now. I may come back with a few more LibreChat guides as I work through thier documentation or see things I'd like to do with the app, but for now, I'm going to take a break and enjoy my secure LibreChat app.